
So how do I fix the stiff left button issue?
So how do I fix the stiff left button issue?
Is this a good question?
Score
4

Rep: 49
![]() 2
2
![]() 1
1
So how do I fix the stiff left button issue?
Is this a good question?
Rep: 49
![]() 3
3
![]() 1
1
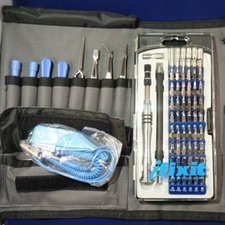
You'll need a small Phillips screwdriver. A size 0x40 works nicely. (Picture 1) Also get a penknife or Xacto knife to peel the gliders off, and some superglue of some type.
To view the pictures larger, just single-click on them. They will zoom for a better view.

(Picture 2) Remove the battery cover and the batteries.
Remove the screws next to the + and - symbols. The other screws will be removed later.

(Picture 3) Lift the edge of the foot gliders with a knife. Peel the sliders off. When you remove them, the adhesive will be useless. Rub it off with your finger and discard. Set the gliders aside.
(Picture 4) Remove the screws that were hidden by the gliders.


(Picture 5) Lift the upper shell away from the base.

(Picture 6) Remove the two remaining screws that hold the blue top to the rest of the shell.

(Picture 7) These screws are smaller than the four screws removed in prior steps. Keep them separate from the other four.

(Picture 8) Push the 2 blue tabs toward the centerline of the mouse, using your fingernail or small screwdriver. This will release the blue plastic from the black shell.

(Picture 9) Wiggle the blue top off of the black shell. It won't take much force at all.

(Picture 10) Look at the black shell. The problem is that the battery contact has lifted out of the plastic, preventing the left button of the blue shell from being depressed. The top edge of the metal should be flush with the black plastic.
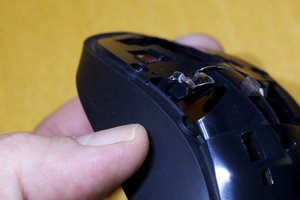
(Picture 11) Push the metal back down into its slot. I used the side of my screwdriver.

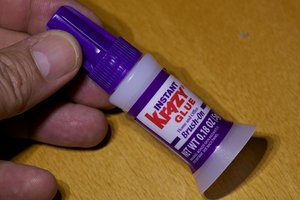
(Picture 12) Apply the glue. (Picture 13) I used Krazy Glue with the brush applicator. This type seems to have a longer working time and took about 5 minutes to dry to the touch. I made myself a nice adult beverage while I waited.

(Picture 14) I put the glue in two spots, which are the glossy areas in the picture.

Let the glue set if needed, and reassemble in reverse order. You will likely have to superglue the gliders back on after you put the screws in the bottom of the mouse. Make sure the glue is dry before setting the mouse down on your desk.
Done! The mouse should have a much nicer "clicky" to it now!
Was this answer helpful?
Excellent explanation and clearly a minor design flaw. It appears the integrated retaining clip on the left side was too short to reach the catch, allowing the movement.
I also flattened the small metal "hump" that protruded up on the left side. (You'd see what I mean when you get to it). A file or side-cutter would work.
Best explanation and very clear

Rep: 508
![]() 10
10
![]() 1
1
1. unscrew both philips screws inside the battery compartment (the ones that are below the batteries). There are two more under the front glide-pads, these go off easily with a sharp knife. Now open up.
2. in the top cover, unscrew both remaining screws. Then release the blue part of the cover a bit by pressing the two latches in the middle. Now shift the whole blue cover forward (button pins must go past the plastic holding them back.
3. Look at the black plastic top cover. You will see the metal plate of the battery terminals. The part below the left button will be lifted a bit (or may already have moved down by all the handling so far. Push it flush with the plastic top, and put some superglue between metal and plastic to lock it in place.
4. reassemble. Done
Was this answer helpful?
ever thought of taking pictures and making this in to a guide for others? it sounds pretty good, people searching for this solution will find it pretty helpful if you have pictures to help. just click on the contribute link at the top and go for it..
well, I glued the glidepads back with superglue, so I won't risk it ;)
But you're right, I should have taken pictures.
Rep: 249
![]() 10
10
![]() 5
5
![]() 5
5
If your left click is taking command properly it would be due to carbon inside left click button.
After using long time it creates problem.Simply open mouse like as shown at up side. Take a small drop of petrol or thinner into button and continuously click by finger and repeat it twice or thrice. Now leave your mouse for dry liquid. Screw your mouse and use it. It will work fine.
I have fixed many mouse like this in my home and friends.
Was this answer helpful?

Rep: 4.2k
![]() 20
20
![]() 34
34
![]() 2
2
if it's really bothering you, like my apple keyboard was after a soda ended up on it.... WD40..... Depending on the cause of the problem, may fix it.
i used a significant amount, also cleaned the keys which are nice and white again, aluminum parts too..... WD40 is great....... it's not an oil per say......everyone uses it for that...... al thou it has a bit in it.....it sucks the moisture out of things and cleans.......in all cases I have used it for, is harmless to electronic components (maybe some types of rubber etc won't like it, haven't had a problem yet).
Was this answer helpful?
Never use WD40 where electronic components are located it does conduct electricity and it does leave a residue. That is why it is used on hinges and things that make noise. If you want to clean electronics components or boards, use Technical Grade Isopropyl Alchohol 99.9% Pure. Be careful with the Isopropyl Alchohol because it will mar (discolor and even warp some plastics). If you want to clean switches and electronic variable resistors (Petentiometers) then use DeoxIT. Sometimes switches in mice will need to be replaced. Then you will need some skills in soldering and desoldering components. To clean rubber keypads that are contained in keyboards and remotes, wash them in the sink with 409 and a toothbrush. Then use an eraser to take the black pads from glossy to a dull black. Speaking with over 20 years of consumer electronic repair down to component level and certified by every electronics manufacturer.
Rep: 13
![]() 1
1
I went to email Logitech support and they said I could get a 1-to-1 exchange from wherever I bought it from. So, I did just that, and managed to exchange it for a new one indeed. You'll need to have a reference number from Logitech.
Was this answer helpful?
Rep: 13
![]() 1
1
Thanks for the fix. I didn't have glue so I simply cut the protruding part (and only the protruding part) of the contact using pliers. This is definitely a design mistake, the contact is simply too large. The mouse works perfect now.
Was this answer helpful?
I used the point of a pair of drawing dividers to engage in the hole of the inner battery terminal plate connection and gently levered it downwards away from the outer casing.
This has solved the problem – time will tell to judge how affective this repair is!
Was this answer helpful?
Nice simple fix Mal. I did same thing using pen refill.
Was this answer helpful?
Thanks for the hint, I didn't suspect the the metal plate but that was it indeed! For me, it was a right button issue though, it would hardly work... I filed the offending part with my dremel so it always sits flush or below the plastic (there's slight movement of the plate/bracket) and tightened the holding tabs. Been using the mouse all day long without issues so I'm a happy camper!
Was this answer helpful?
Your diagnosis was perfect for my V470 mouse. Based on that all I needed to do was wedge the tip of a small flat blade screwdriver above the metal contact plate and press it down, moving it back in proper place. No disassembly required.
Was this answer helpful?
Past 24 Hours: 2
Past 7 Days: 7
Past 30 Days: 33
All Time: 20,027