
The fifth Google Nexus phone. Officially announced on October 31, 2013, it sports a 4.95" 1080p display, a 2.26 GHz Snapdragon processor, and LTE support. Powered by Android 4.4.2, KITKAT. Manufactured by LG.

222 Questions View all

nexus 5 wireless charging broken after...

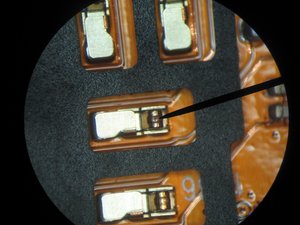
So I successfully replaced the screen door the n5 after a run in with a brick floor in Arizona. Is all together but now the wireless charging isn't working. As I believe it to be the magnetic circles in the back cover and two leads coming off the to left.... I can't understand why it won't see it to charge it. What an I missing? Any ideas?

Answer this question I have this problem too

Is this a good question?

Score 12
2 Comments

This question was migrated from http://meta.ifixit.com/Answers.

by

I replaced the n5 battery and also made sure to snap the back at the S, but my phone still won't charge. I had a few hours of power because of the battery but I have not been able to charge it. What am I missing please????

by

Add a comment

11 Answers

Most Helpful Answer

Hey Scott,

I had the same issue before when I swapped the back on my N5. Try making sure the last clip is snapped in place the centre of the phone. It holds the contacts to the wireless coil.

Was this answer helpful?

Score 95

49 Comments:

I thought this was referring to the outside clips, but there is in fact one dead center of back that meets with the main logic board, just press firmly a couple of centimeters above the S in nexus.

Thanks for the tip Greg!

by

Thanks. This fixed mine!

by

Me too, thanks for this tip!

by

Thanks! This worked for me too!

by

fixed mine. When reading "Nexus" on the phone while holding it sideways, it was about where you would add a period to the phrase (just below and to the right of the s). Thanks thanks thanks!

by

Show 44 more comments

Add a comment

I also seem to have broken my wireless charging after removing the back. I had missed the middle snap that Scott mentioned, but snapping this only made it work intermittently for a few days. It is now back to not working at all, and I can see nothing mechanically wrong.

I'll be interested to see if you find a fix....

Edit: I seem to have found the problem in mine. After taking the back off several times, and looking at it under the microscope, I finally noticed something. Where the needle is pointing you can see a small brown spot on the top of one of the springy contacts. This picture was taken _after_ I scraped off a dark brown mass that looked like it had melted on. (Note to self - take before pictures too...)

My theory as to what happened is that when I put the back on without a good contact (the middle snap loose) there was some arcing that melted/oxidized the contact. This prevented good contact from being made. Now that I have scraped that off (which was pretty hard to do), it seems to be working again. For the last 5 minutes at least...

Block Image

Was this answer helpful?

Score 12

11 Comments:

I almost had the same, I just noticed it wasn't make proper contact. So I pushed them out a bit for better contact. Worked like a charm

by

thxxxx IT reallly workkkkk !!!!!!

by

Cleaning with electrical cleaner was the key for me. I just cleaned all contact points, and Walla! Back in business. Thanks Roy!

by

I am having a similar issue, I clipping in the snap near the 'S' but it will still not work... if I have it on the QI charger and press down on the phone it will connect... I'm still not able to make contact it appears...

Any Suggestions?

by

Yup, pulling up the contacts a bit with a dental pick did it for me. This after having to change out the USB charging board because the phone overheated the USB connector and melted a couple of cables before I figured that out.

by

Show 6 more comments

Add a comment

This answer from Jose on the ifixit N5 teardown page offers even better detail on where to reconnect the Qi wireless charging connector.

"Make sure to press not only the side tabs back in place when putting it back together but the middle also. I put mine back together and my wireless charging stopped working. Once I ran my fingers through the middle of the phone in a pressing motion moving from bottom and working my way up, I heard a click and then the wireless charging started working again. You will notice if that tab is not in all the way because the back bubbles and if you poke it you see it give a little."

I discovered the click happened in the middle of the phone right below where the camera lens is.

Nexus 5 Teardown

Was this answer helpful?

Score 6

1 Comment:

Thanks that worked for as well.

by

Add a comment

Just push the middle part of the cover, then you will hear the "CLICK" sound. The wireless charging should be work if all contact were connected.

Was this answer helpful?

Score 2

1 Comment:

It works for me too. Thank you.

by

Add a comment

Which Wireless Charger is the best in the current market? CHOETECH launch affordable & best Dual USB AC Wall Charger Spatially Design For Apple & Android Phones - http://www.amazon.com/dp/B00HZF6UD4

Was this answer helpful?

Score 0
Add a comment

Removed the back, scraped the 4 contacts a bit and I made sure to apply a good pressure at the point of contact after I put back the cover. Works well now. I think it stopped working after a medium fall on a wooden floor.

Was this answer helpful?

Score 0
Add a comment

Hello there, I have the same problem. I think the contacts have oxidized and wireless charging no longer works. How do I go about scraping it so that it works?

Was this answer helpful?

Score 0

1 Comment:

Never mind. I tried replacing the white one with a black one that I got from China. I put the white one back on, and figured that that problem is probably with the black one. Noticed that the place where the contact is being bade is not touching the right place because of the small dent. Going to try and move it and try it again.

by

Add a comment

Hi There

I seem to have the same issue iwth my N5. I tried to buy a replacement cover but it didn't work at all. I also tried to scrape the black stuff away, but hadn't that much success with it.

So my question goes to Greg; how did you scrape that stuff off? I tried using a cutter - I didn't want to use heavier tools because these spring contacts seem very fragile. Should I give it a try with a nail file?

Thanks!

Was this answer helpful?

Score 0
Add a comment

I too also ordered another back cover from China, unfortunately ran into the same issues with the back snaps. I ended up using my original backcover... with this workaround:

Take a razor blade and gently peel the adhesive contacts away from the back cover. Then place 2 small strips of duct tape (stacked) underneath and glue the contacts to it. Voila! Closes the gap nicely and works like a charm! :D

I don't see this problem recurring after now that the gap has been closed!

Was this answer helpful?

Score 0
Add a comment

I had the same problem as roy, apparently. However, not snapping the middle snap of the back properly had left little craters in the gold contacts on the back, the springs on the phone side were OK.

Scraping and cleaning the contacts in the back with tuner spray was not enough. I slightly bent the tiny spring contacts on the phone side sideways (with a needle) so they now touch unharmed surface of the gold contacts in the back.

This did it.

If you need to copy this, be warned to be very cautious, as you can break the contacts...

Was this answer helpful?

Score 0
Add a comment

The inductive circuit for charging is attached to the battery door. assuming you didn't crack it during the removal of the battery door, you can attempt the following

1)Scan for damage. ensure all 4 of the pins that pressure connect to the panel, are still in tact on the board, and there is no tears in the inductive coil flex

2) clip down the battery door into the housing to ensure proper connection

3) if clipping it in doesn't work, then try putting a dollop of solder on each of the traces of the flex. make sure it is rounded up a bit to give a better connection

4) if all else fails, try replacing the battery door. (ensure the new component comes with the inductive coil)

5) if none of these fix the issue, you are looking at a board failure. this will not be worth your money to fix.

Was this answer helpful?

Score 0

2 Comments:

This had been solved, no need to answer here

by

if it had been solved, then it would come up as solved. but thank you for your input.

by

Add a comment

Add your answer

Scott Xavier will be eternally grateful.
View Statistics:

Past 24 Hours: 0

Past 7 Days: 0

Past 30 Days: 5

All Time: 38,882