If you own a pencil-thin soldering iron like the Weller WM120 you can try to solder the power switch socket at the exact position it was fixed before it was pulled from the board. Only two solders have to be done to restore the power functionality. If you don't have the socket then you can solder the blue and whites wires directly to the power solder pads on the logic board.
Here's the procedure:
1- remove the socket from the board if it's still attached but loose if it can't be resoldered in place.
2- find 2 wires of the same gage (and color if you can) than the blue and white power switch wires
3- skin them less than 1/4" and apply solder on the ends with the solder iron
4- apply the wires ends to the two solder points contact on the logic board (white=left, blue=right)
5- apply briefly the solder iron tip to the wires ends and solder them to the board
6- find a way to secure the two soldered wires inside the iBook bottom case
7- cut the blue & white power switch wires and skin them
8- solder them to a male mini connector
9- solder a female mini socket to the other cable
10- insert the connector to the socket and you're done
11- use hot glue to secure the solder job on the logic board
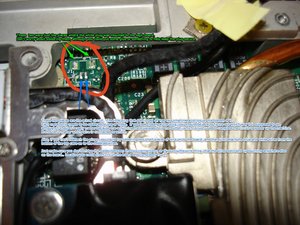
You can also solder the blue and white wires directly to the logic board but you wont be able to separate completely the top case from the bottom case. When you're in front of the iBook the white cable goes to the left solder pad and the blue wire to the right solder pad. On the pict the blue arrows indicate the two contact points that triggers the iBook power. The two bigger pads at rear just retain the original socket to the board.
CAUTION: use a fine solder iron tip and don't bridge the two contact points with solder, your board would be kaput. Good luck...


4 Comments
Yeah, I might just solder the wires to the board or add some pigtails and another connnector,
by Keith Barkley
That is what I was thinking, but when I got it to a microscope (it is nice working with small electronics for my day job, it was clear what I had pulled loose. I touched everything with a little more solder, so we will see if it works. I will post back in an hour. 8^)
by Keith Barkley
Well, it worked. Though this connector seems to break the cardinal rule of soldering: Don't use a soldered connection as a mechanical connection! So as long as the connector has just pulled away from the pads, it is possible to get a fine-tipped soldering iron in there to touch up the solder.
by Keith Barkley
you might want to open it up, and take a look inside and see if you can fix the connector. As far as my knowlage tells me, there is no way to turn the computer on without the power button.
by Chris Green